> ## Documentation Index
> Fetch the complete documentation index at: https://docs.knowlix.ai/llms.txt
> Use this file to discover all available pages before exploring further.
# AI Notetaker
> Automatically sync your Outlook Calendar with Knowlix for AI-powered meeting management, transcription, and intelligent scheduling
Knowlix AI Notetaker automatically syncs your Outlook Calendar with Knowlix, enabling AI-powered meeting management, transcription, and intelligent scheduling. Follow this guide to connect your Microsoft account.
The AI Notetaker integration provides:
* **Outlook Calendar Sync:** Two-way synchronization with Microsoft Outlook
* **Meeting Detection:** Automatically imports your meetings to Knowlix
* **AI Transcription:** Real-time meeting transcription with speaker identification
* **Smart Summaries:** AI-generated meeting summaries with action items
* **Unified Calendar:** Manage all your events in one place
***
### 1. Access Microsoft Entra Admin Center
Start by registering a new application in Microsoft Entra ID (formerly Azure AD).
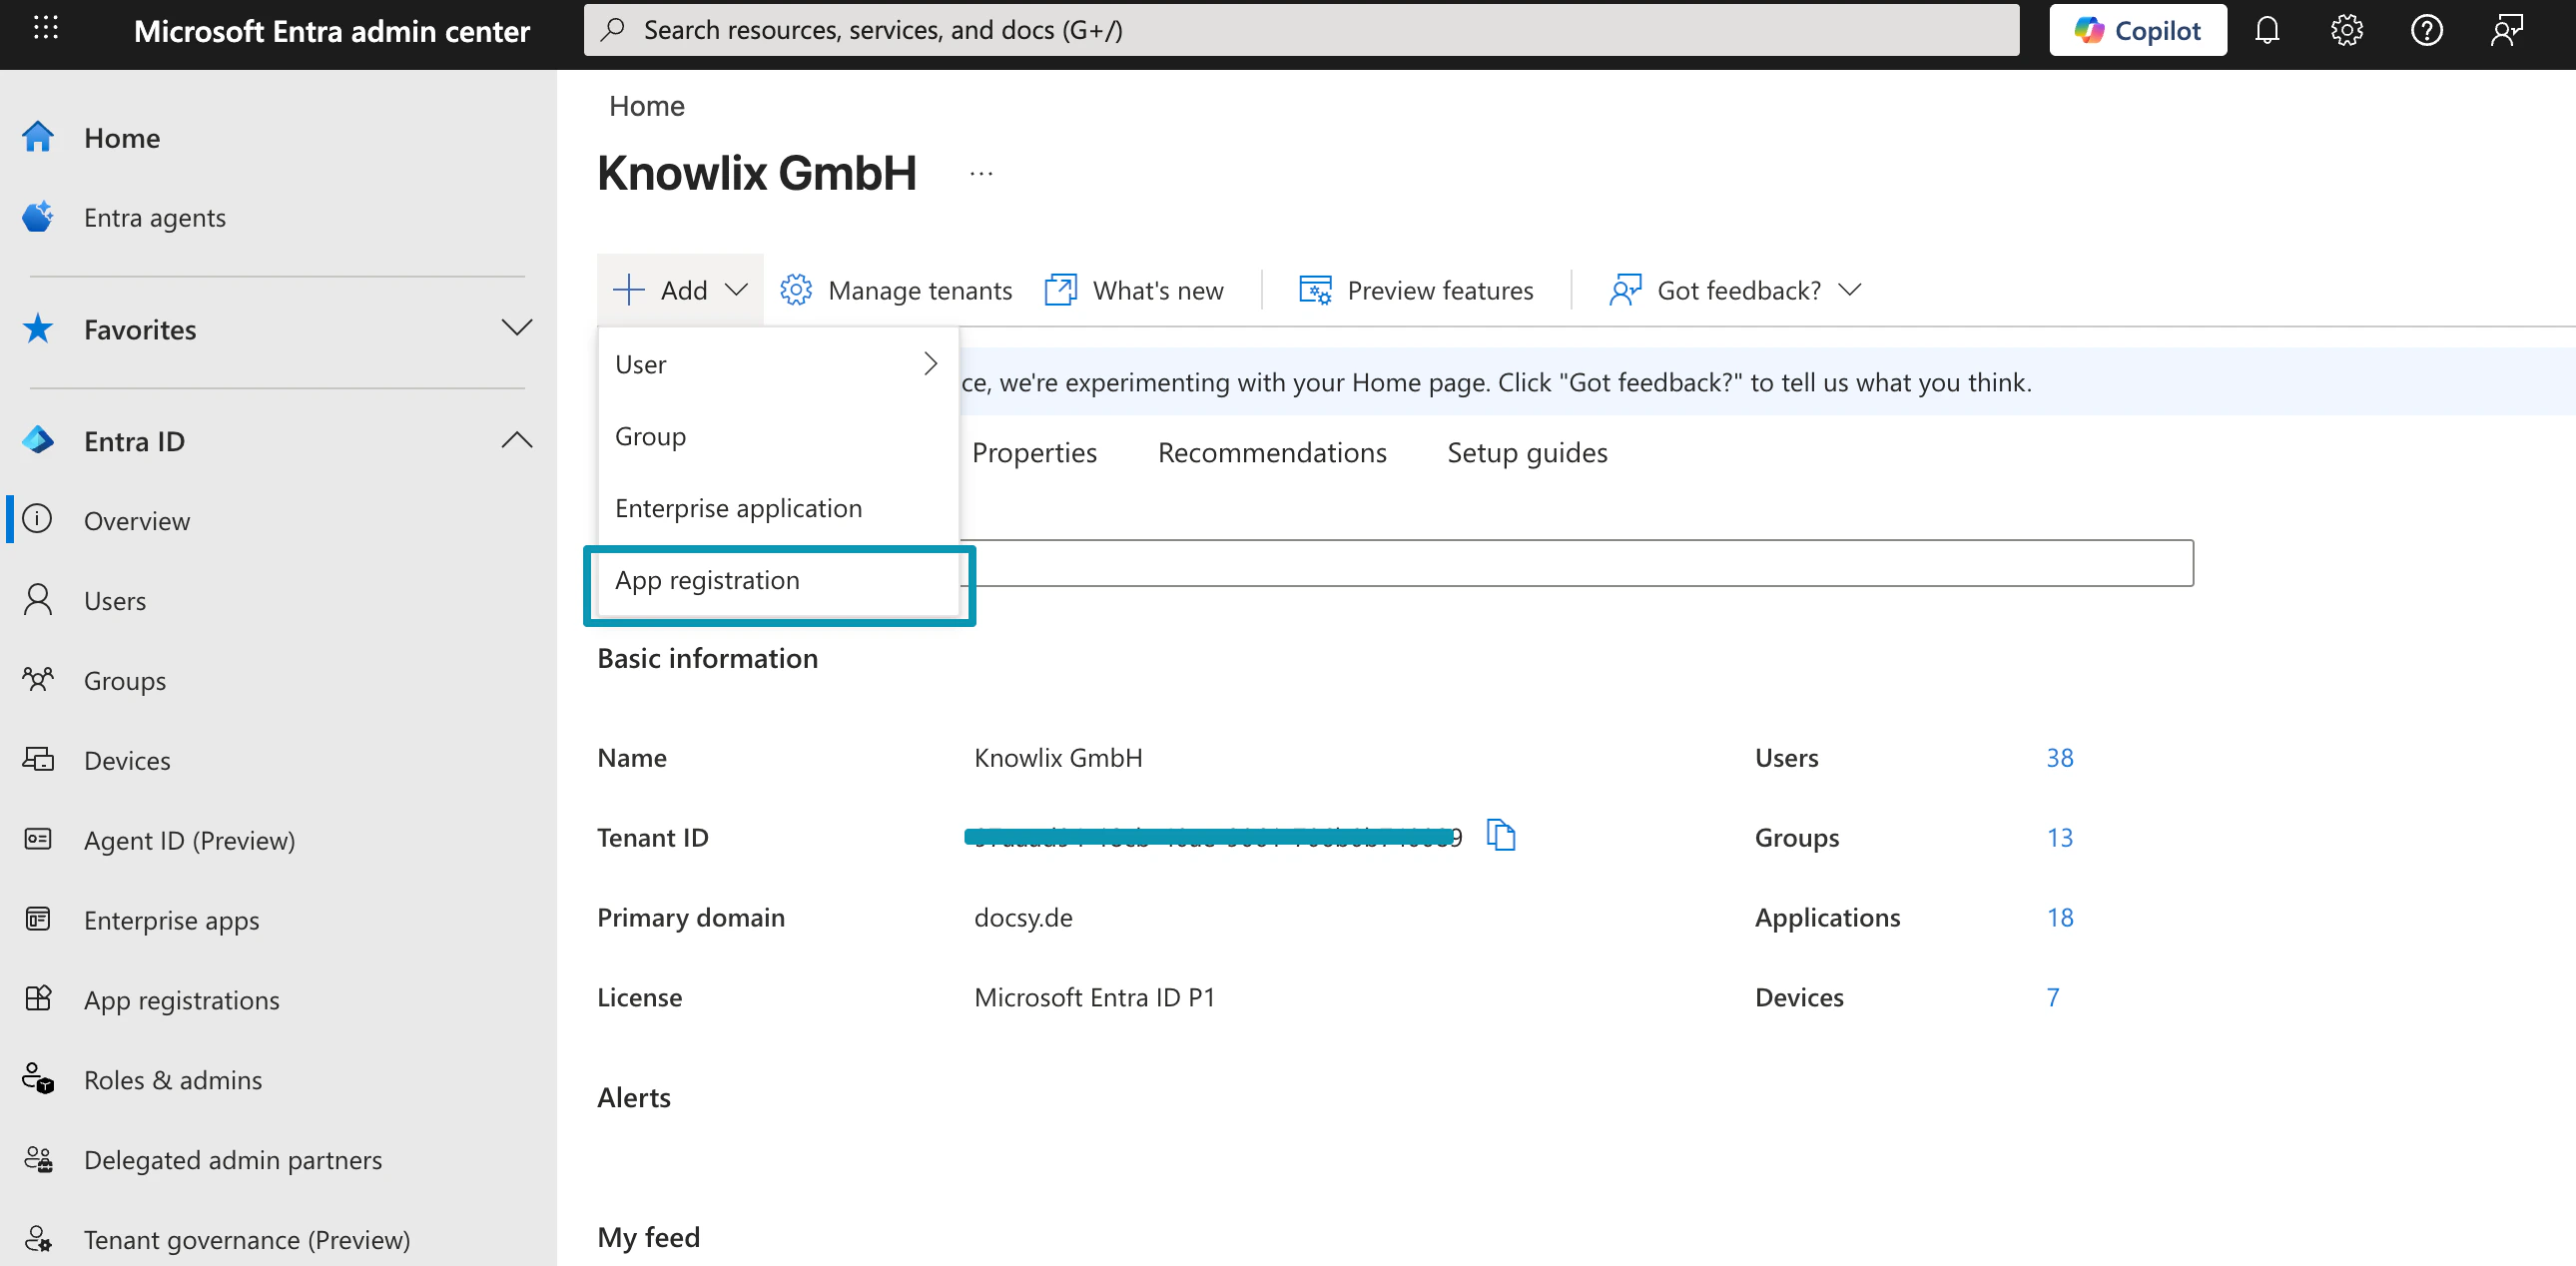 * Sign in to [Microsoft Entra Admin Center](https://entra.microsoft.com) with your admin account
* In the left sidebar, navigate to **Entra ID**
* Click the **+ Add** dropdown in the top menu
* Select **App registration** from the options
This opens the application registration form where you'll configure access for Knowlix.
***
### 2. Register the Application
Fill out the registration form to create your Knowlix integration app.
* Sign in to [Microsoft Entra Admin Center](https://entra.microsoft.com) with your admin account
* In the left sidebar, navigate to **Entra ID**
* Click the **+ Add** dropdown in the top menu
* Select **App registration** from the options
This opens the application registration form where you'll configure access for Knowlix.
***
### 2. Register the Application
Fill out the registration form to create your Knowlix integration app.
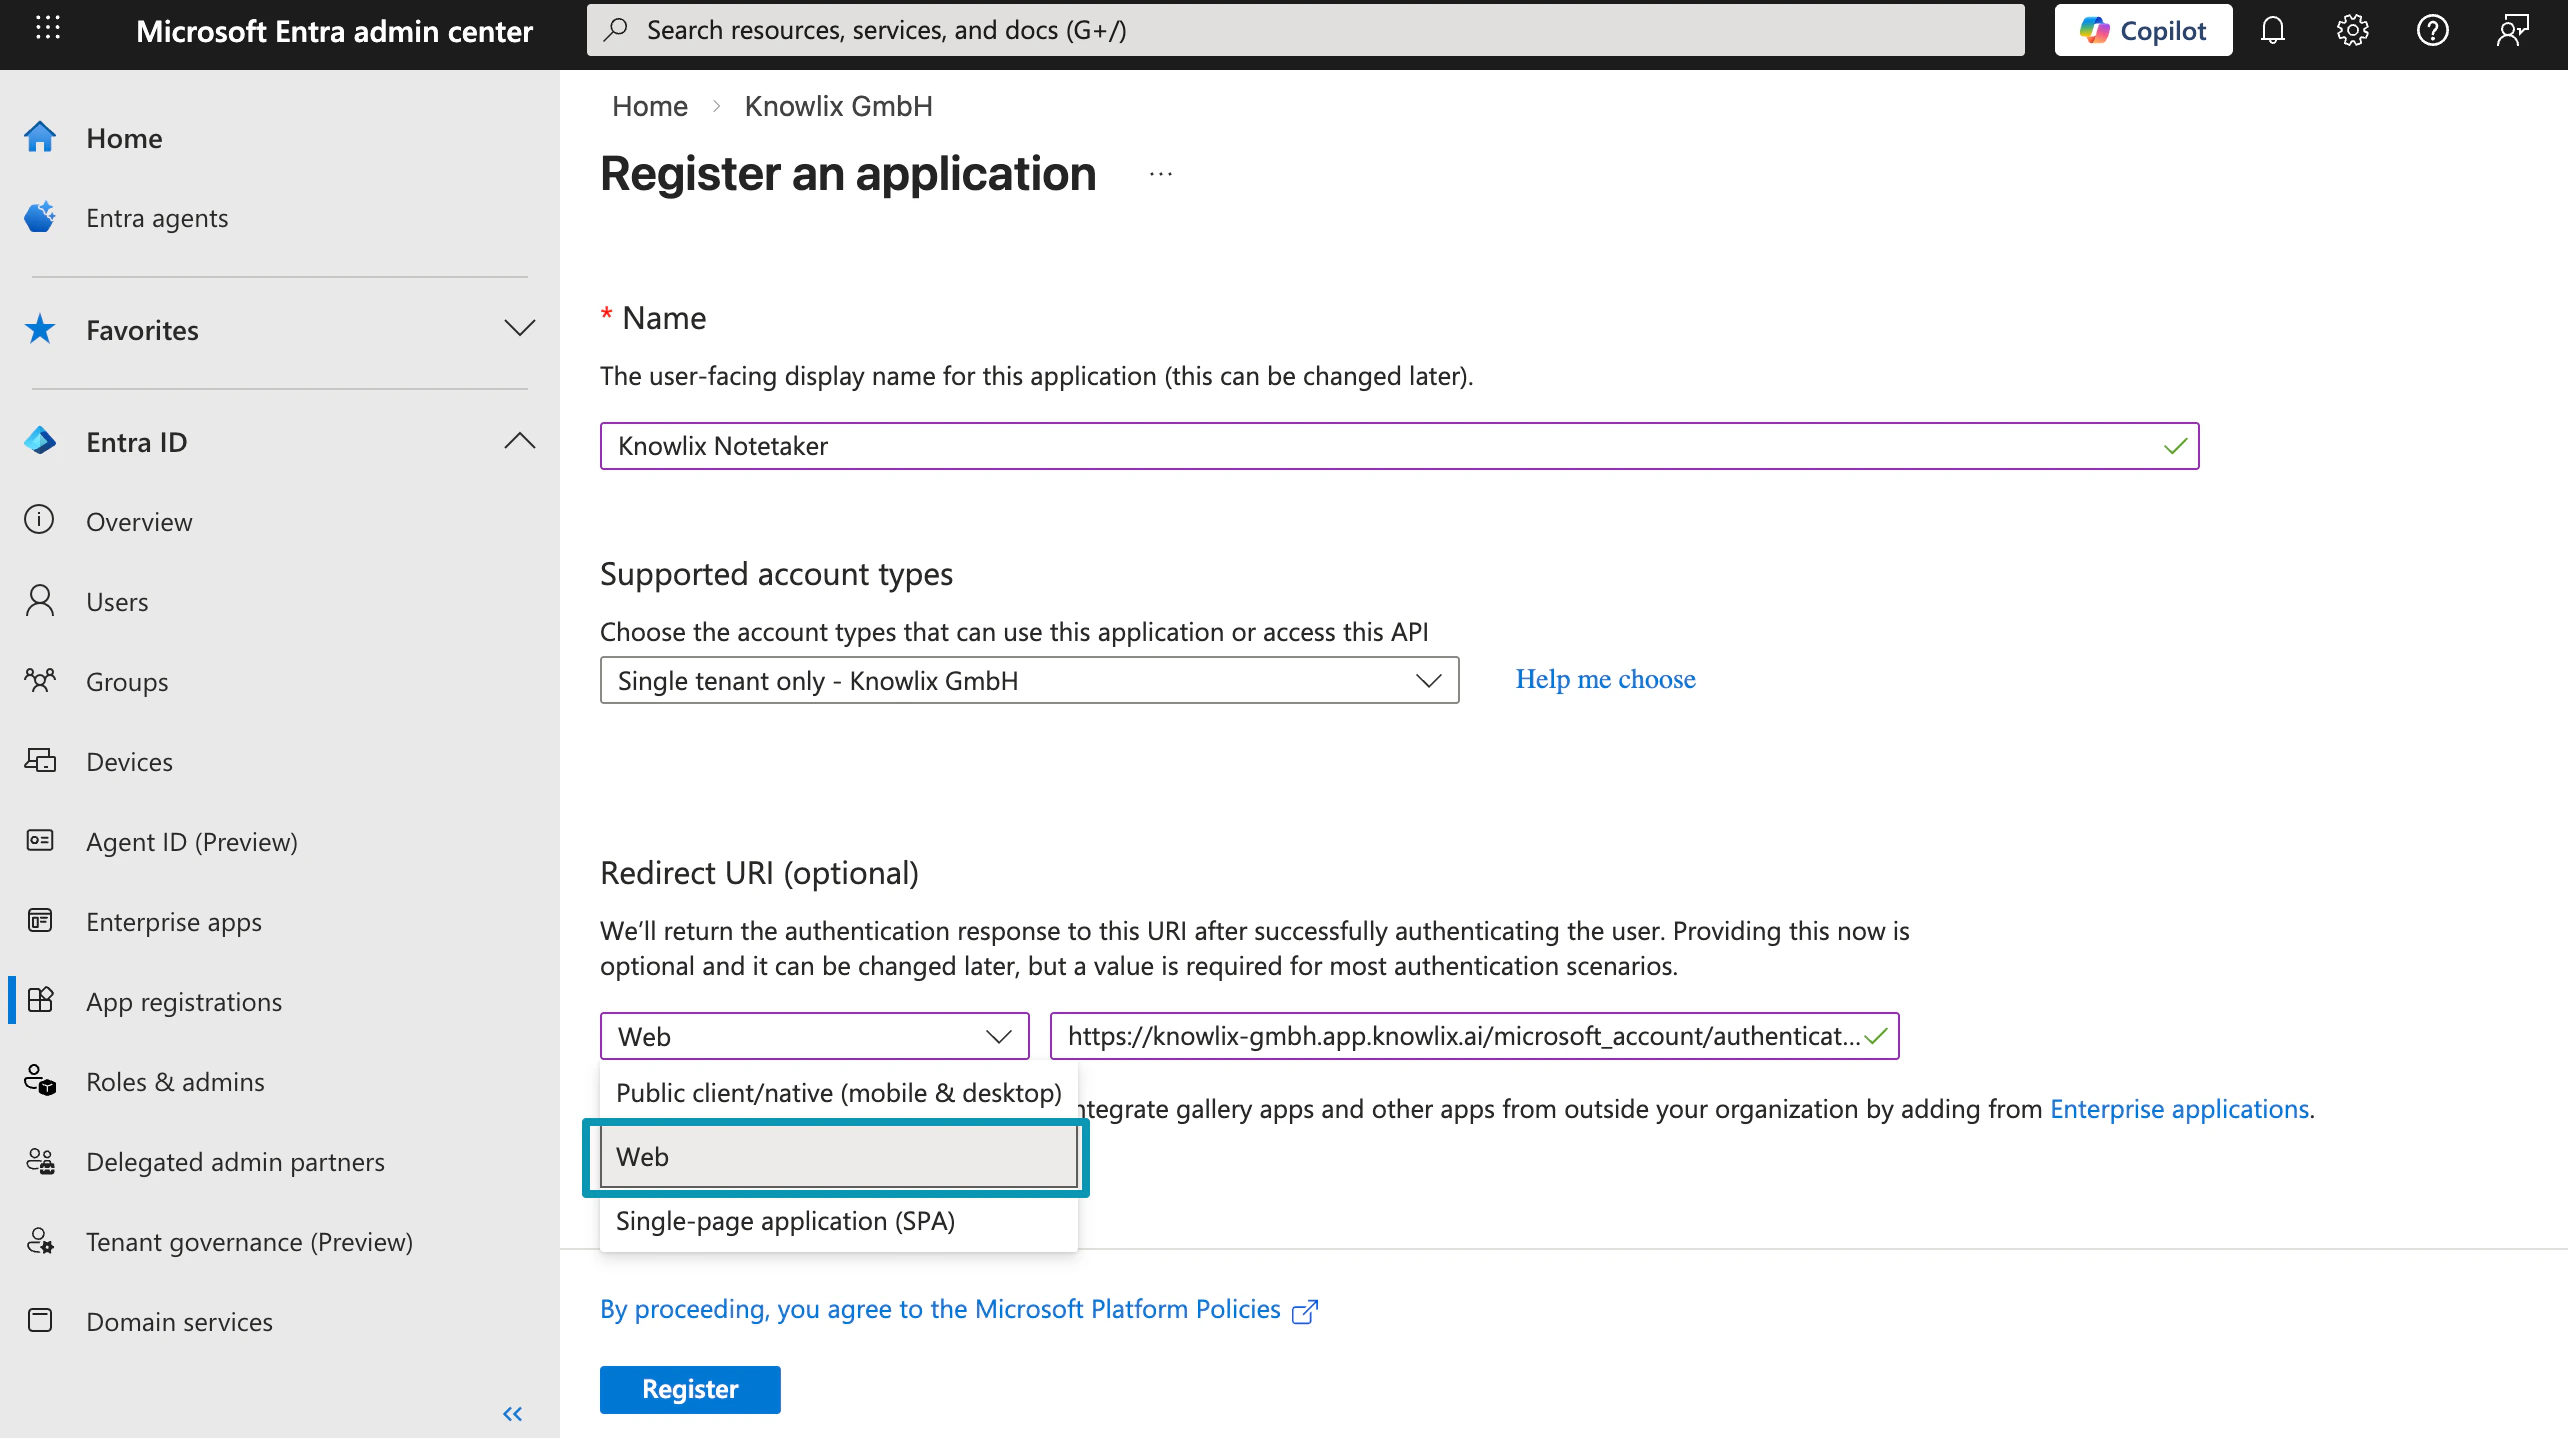 **Required Fields:**
* **Name:** Enter a descriptive name (e.g., `Knowlix Notetaker`)
* **Supported account types:** Select **Single tenant only - \[Your Organization]** for company use
* **Redirect URI (optional):**
* Platform: Select **Web**
* URL: Enter `https://[your-company].app.knowlix.ai/microsoft_account/authentication`
Click **Register** to create the application.
***
### 3. Copy Your Credentials
After registration, the app overview page displays your essential credentials.
**Required Fields:**
* **Name:** Enter a descriptive name (e.g., `Knowlix Notetaker`)
* **Supported account types:** Select **Single tenant only - \[Your Organization]** for company use
* **Redirect URI (optional):**
* Platform: Select **Web**
* URL: Enter `https://[your-company].app.knowlix.ai/microsoft_account/authentication`
Click **Register** to create the application.
***
### 3. Copy Your Credentials
After registration, the app overview page displays your essential credentials.
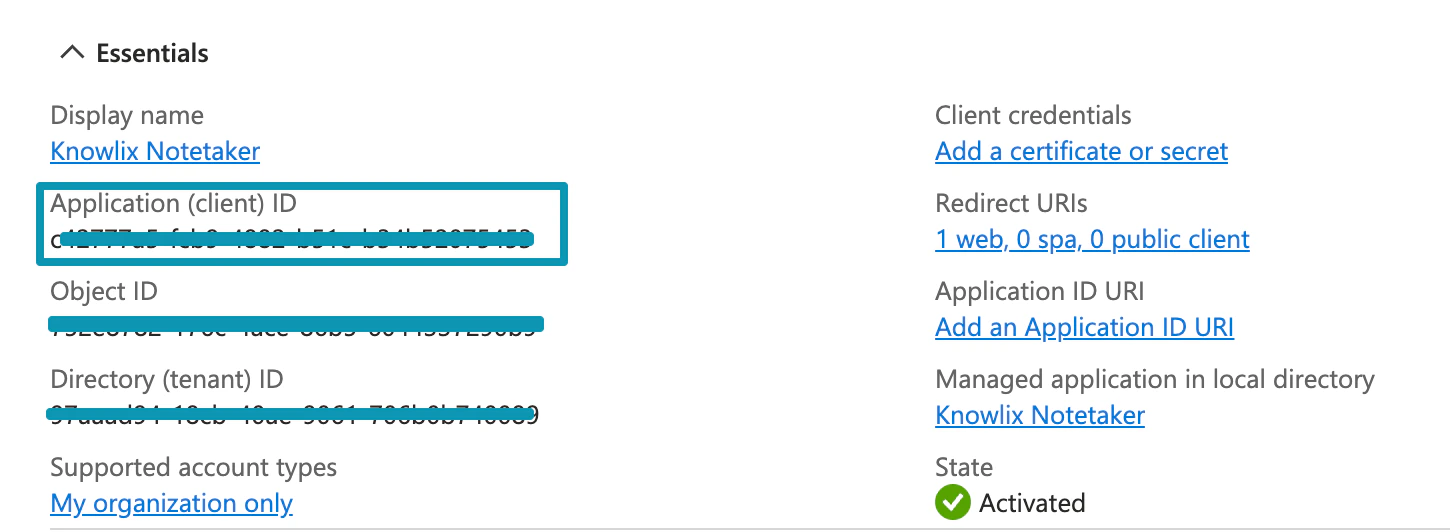 **Save these values (you'll need them in Knowlix):**
* **Application (client) ID:** Your unique app identifier (highlighted in blue box)
* **Directory (tenant) ID:** Your organization's tenant identifier
Also verify:
* **Redirect URIs:** Shows "1 web, 0 spa, 0 public client"
* **State:** Shows green checkmark with "Activated"
***
### 4. Create Client Secret
Generate a secret key for secure authentication between Knowlix and Microsoft.
**Save these values (you'll need them in Knowlix):**
* **Application (client) ID:** Your unique app identifier (highlighted in blue box)
* **Directory (tenant) ID:** Your organization's tenant identifier
Also verify:
* **Redirect URIs:** Shows "1 web, 0 spa, 0 public client"
* **State:** Shows green checkmark with "Activated"
***
### 4. Create Client Secret
Generate a secret key for secure authentication between Knowlix and Microsoft.
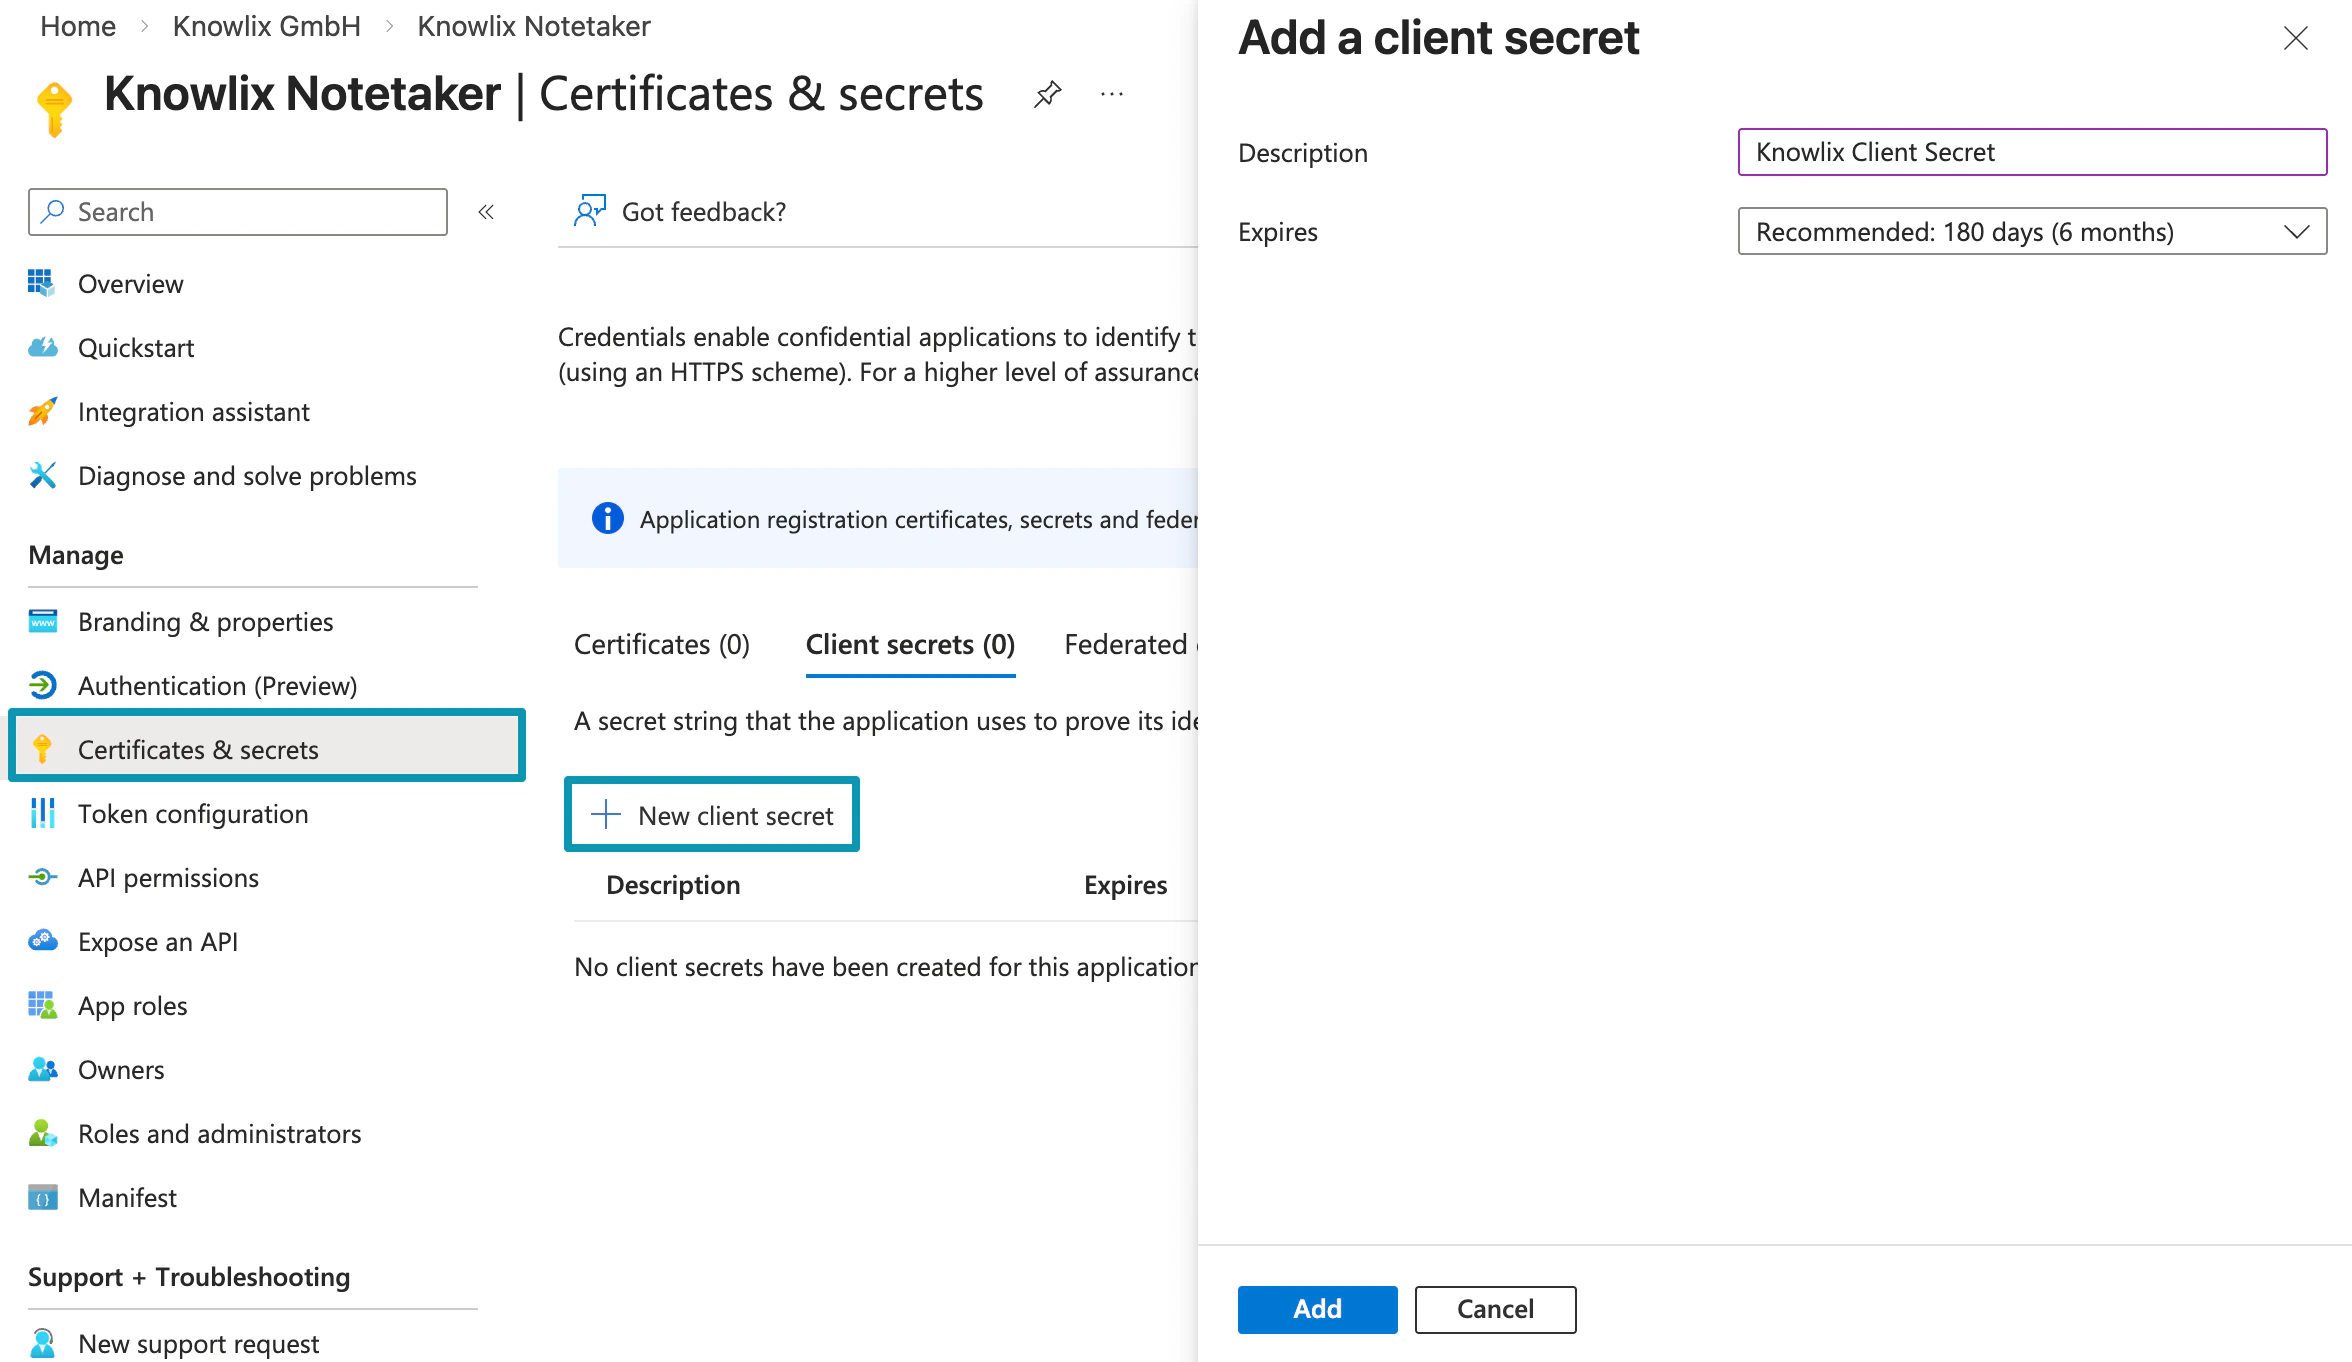 **Steps:**
* In the left sidebar, click **Certificates & secrets**
* Click **+ New client secret**
* In the modal that appears:
* **Description:** Enter a name (e.g., `Knowlix Client Secret`)
* **Expires:** Select recommended duration (180 days / 6 months)
* Click **Add**
Copy the **Value** immediately after creation. This is your Client Secret and will only be displayed once. If you navigate away, you'll need to create a new secret.
***
### 5. Open Calendar Settings in Knowlix
Now configure Knowlix to use your Azure credentials.
**Steps:**
* In the left sidebar, click **Certificates & secrets**
* Click **+ New client secret**
* In the modal that appears:
* **Description:** Enter a name (e.g., `Knowlix Client Secret`)
* **Expires:** Select recommended duration (180 days / 6 months)
* Click **Add**
Copy the **Value** immediately after creation. This is your Client Secret and will only be displayed once. If you navigate away, you'll need to create a new secret.
***
### 5. Open Calendar Settings in Knowlix
Now configure Knowlix to use your Azure credentials.
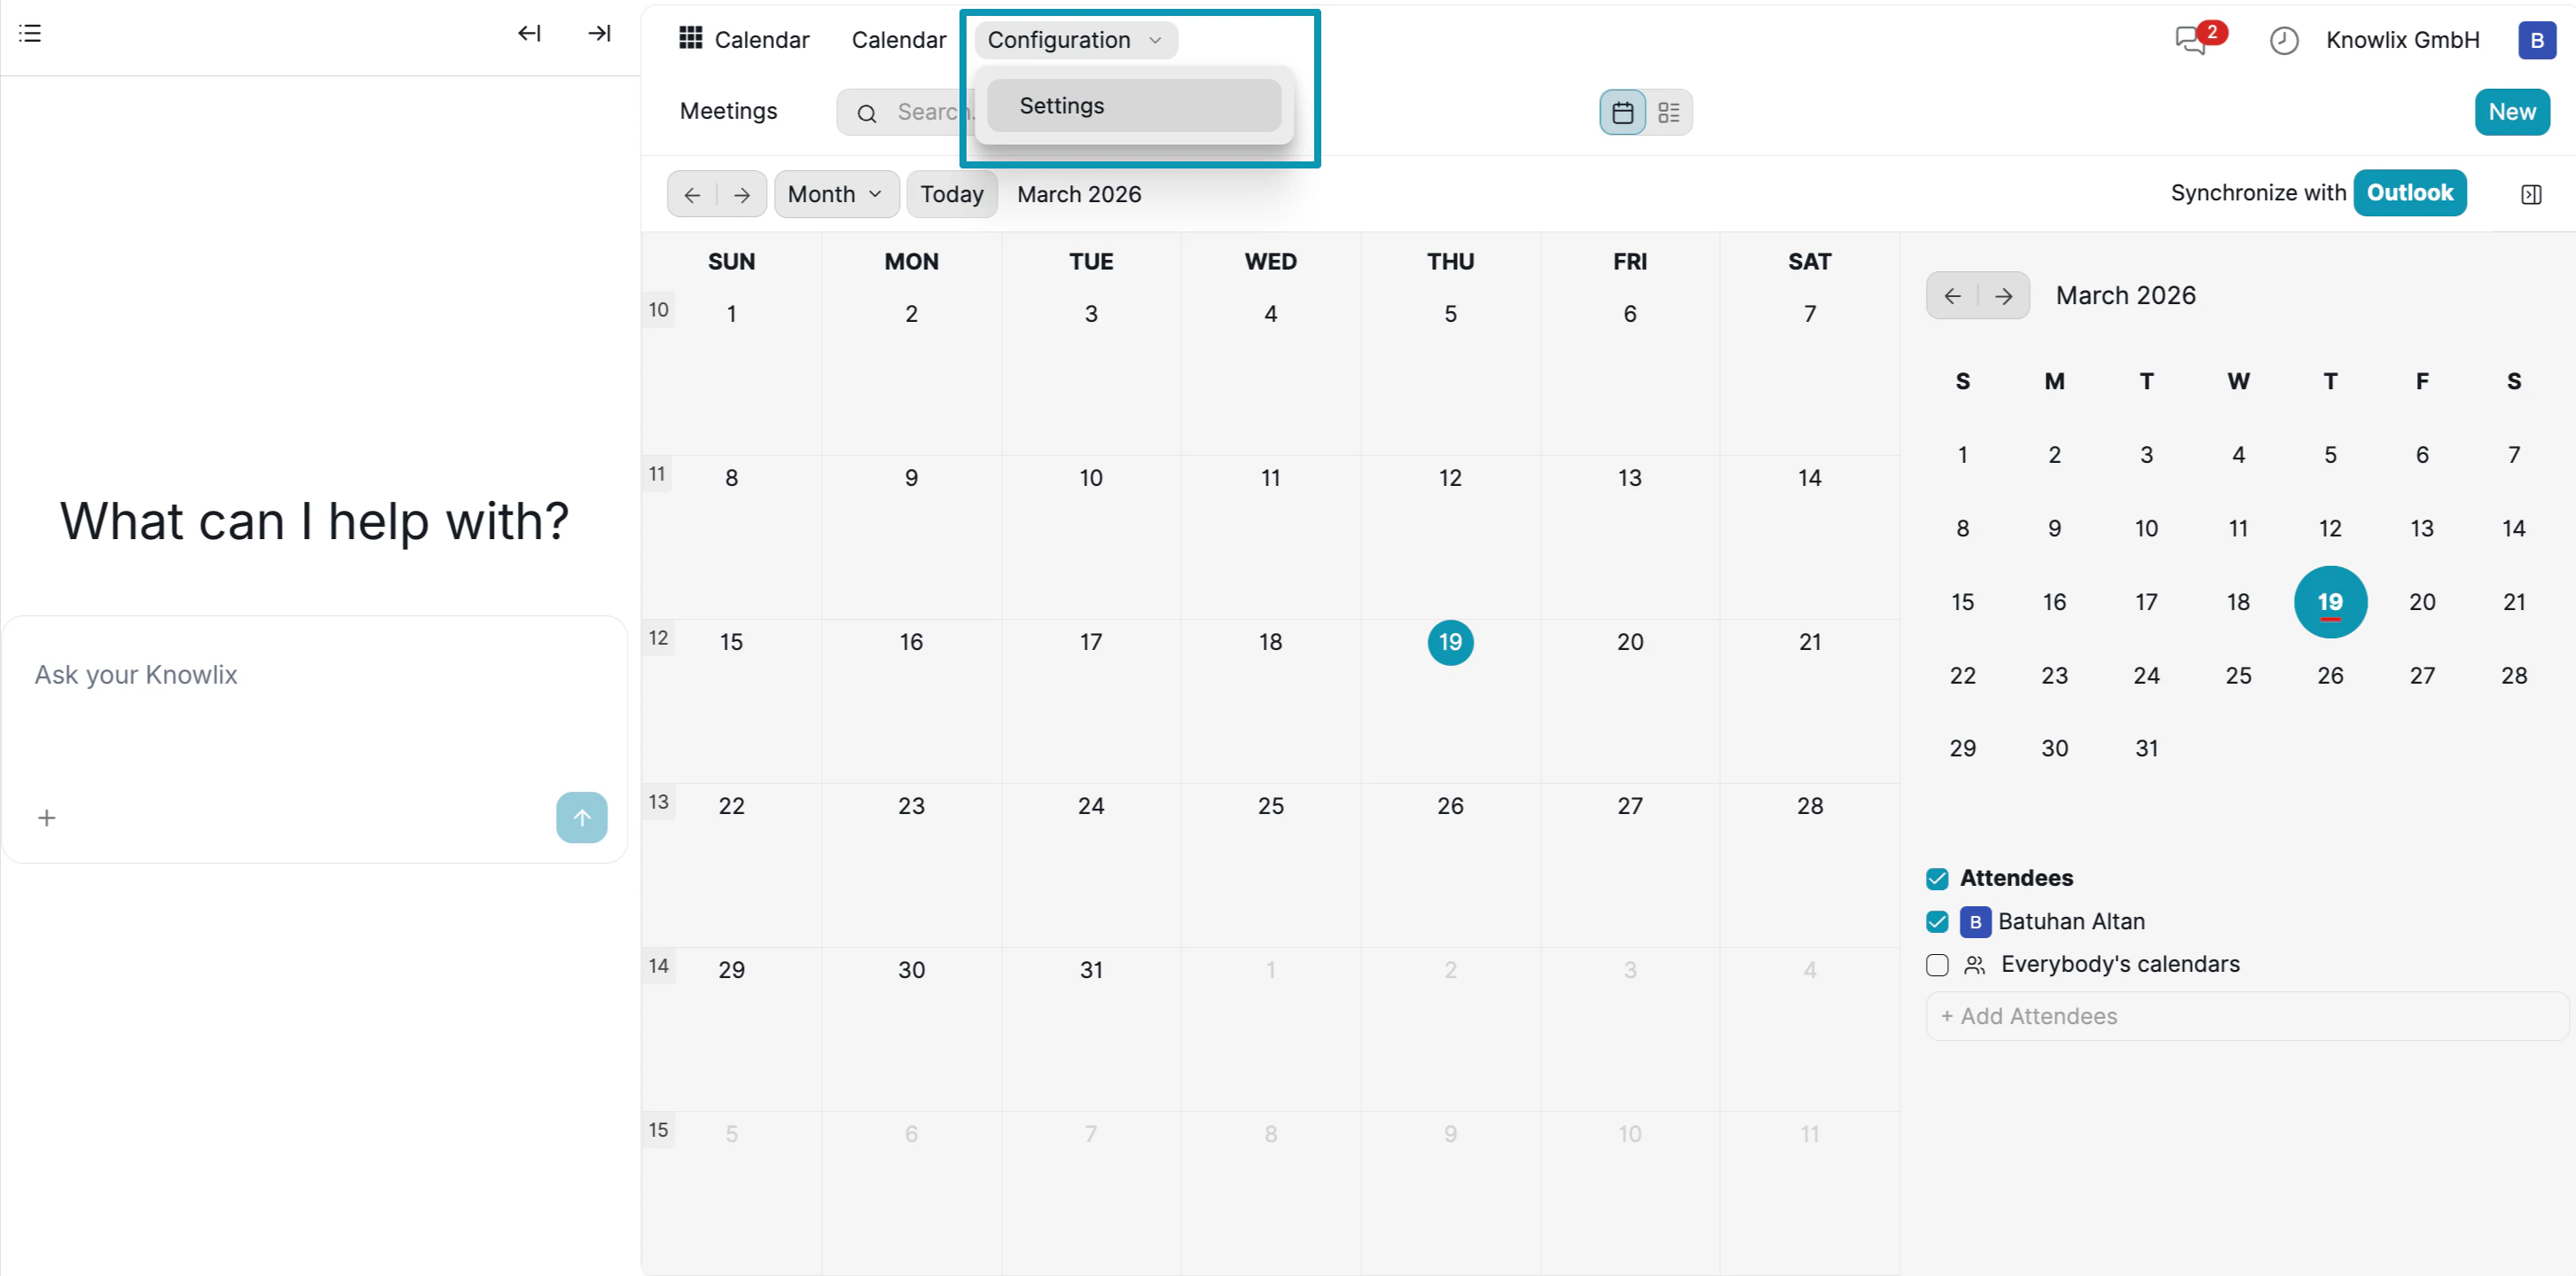 * In Knowlix, navigate to the **Calendar** module
* Click the **Configuration** dropdown in the top menu
* Select **Settings**
This opens the Calendar Settings page where you'll enter your Microsoft credentials.
***
### 6. Enter Azure Credentials
Connect your Microsoft app to Knowlix by entering the credentials you copied earlier.
* In Knowlix, navigate to the **Calendar** module
* Click the **Configuration** dropdown in the top menu
* Select **Settings**
This opens the Calendar Settings page where you'll enter your Microsoft credentials.
***
### 6. Enter Azure Credentials
Connect your Microsoft app to Knowlix by entering the credentials you copied earlier.
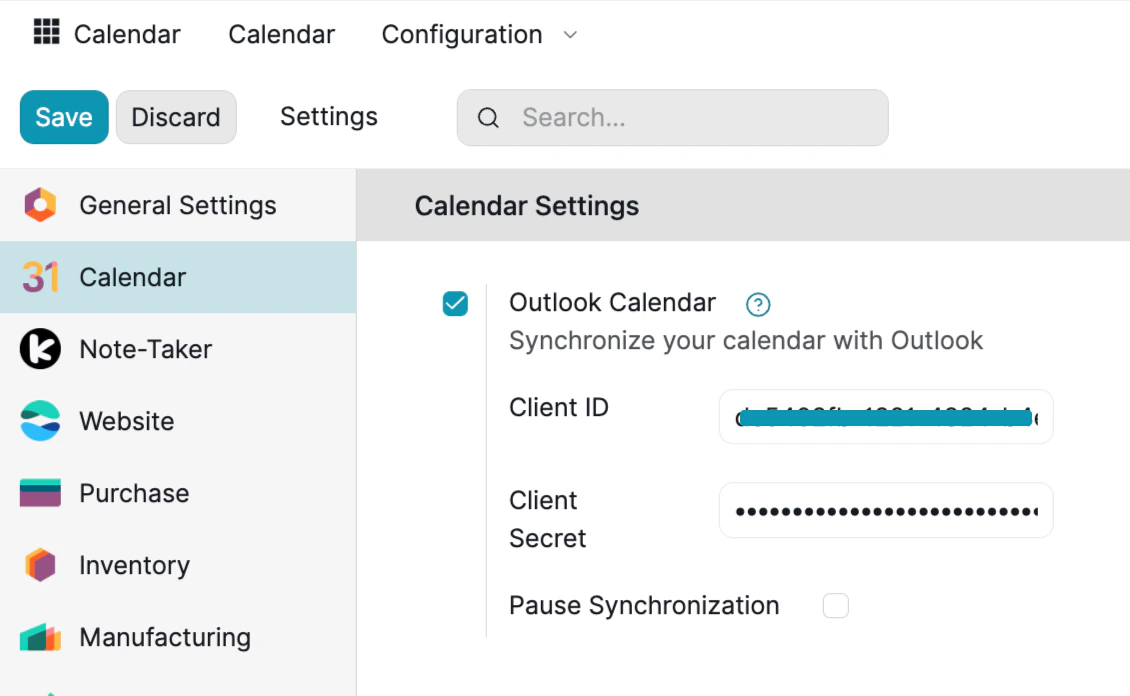 **Configuration Steps:**
* In the left sidebar, select **Calendar**
* Check the **Outlook Calendar** checkbox to enable synchronization
* Enter your credentials:
* **Client ID:** Paste your Application (client) ID from Azure
* **Client Secret:** Paste the secret value you created
* Leave **Pause Synchronization** unchecked to enable automatic sync
* Click **Save** at the top
You can also access **Note-Taker** settings from this same menu for additional AI features.
***
### 7. Synchronize with Outlook
Initiate the first sync to connect your calendars.
**Configuration Steps:**
* In the left sidebar, select **Calendar**
* Check the **Outlook Calendar** checkbox to enable synchronization
* Enter your credentials:
* **Client ID:** Paste your Application (client) ID from Azure
* **Client Secret:** Paste the secret value you created
* Leave **Pause Synchronization** unchecked to enable automatic sync
* Click **Save** at the top
You can also access **Note-Taker** settings from this same menu for additional AI features.
***
### 7. Synchronize with Outlook
Initiate the first sync to connect your calendars.
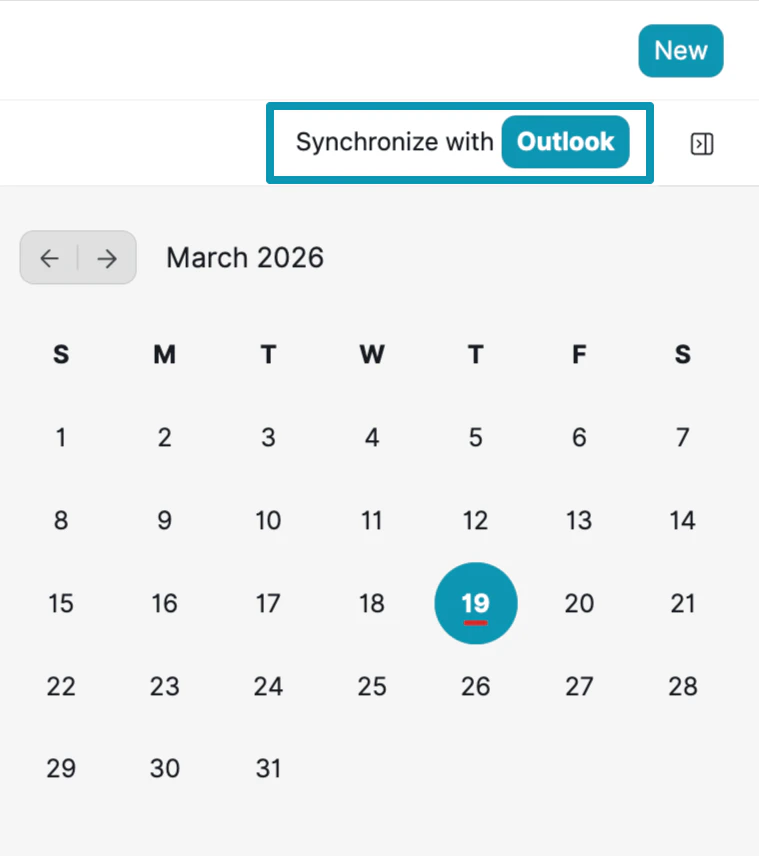 * Return to the **Calendar** main view
* Click the **Synchronize with Outlook** button (highlighted in blue)
* Sign in with your Microsoft 365 / Outlook account when prompted
* Accept the permission request
Your Outlook calendar events will now sync to Knowlix. The synchronization runs automatically, keeping both calendars updated.
***
### Using AI Notetaker Features
With Outlook connected, you can now use the AI Notetaker capabilities:
**Meeting Sync:**
* All your Outlook meetings appear in the Knowlix Calendar
* New meetings created in Knowlix sync back to Outlook
* Changes in either calendar are reflected in both
**AI Meeting Assistant:**
Use the AI Chat panel to interact with your calendar:
*"What meetings do I have tomorrow?"*
*"Schedule a meeting with the sales team next Tuesday at 2 PM"*
*"Summarize my meetings from last week"*
**Transcription & Summaries:**
* Enable AI transcription for any meeting
* After meetings, AI generates summaries with key points and action items
* Transcripts are searchable and linked to calendar events
* Return to the **Calendar** main view
* Click the **Synchronize with Outlook** button (highlighted in blue)
* Sign in with your Microsoft 365 / Outlook account when prompted
* Accept the permission request
Your Outlook calendar events will now sync to Knowlix. The synchronization runs automatically, keeping both calendars updated.
***
### Using AI Notetaker Features
With Outlook connected, you can now use the AI Notetaker capabilities:
**Meeting Sync:**
* All your Outlook meetings appear in the Knowlix Calendar
* New meetings created in Knowlix sync back to Outlook
* Changes in either calendar are reflected in both
**AI Meeting Assistant:**
Use the AI Chat panel to interact with your calendar:
*"What meetings do I have tomorrow?"*
*"Schedule a meeting with the sales team next Tuesday at 2 PM"*
*"Summarize my meetings from last week"*
**Transcription & Summaries:**
* Enable AI transcription for any meeting
* After meetings, AI generates summaries with key points and action items
* Transcripts are searchable and linked to calendar events